Products List
Used for creating new, editing, managing order, publishing, unpublishing and setting global options of products shown.
How to access
- Select Extensions → MyMuse→ Products from the drop-down menu of the Joomla! Administrator Panel.
- Click the Products link in the submenu
Description
The Product Manager is used to add and edit products. See Toolbar below for a detailed list of all functions.
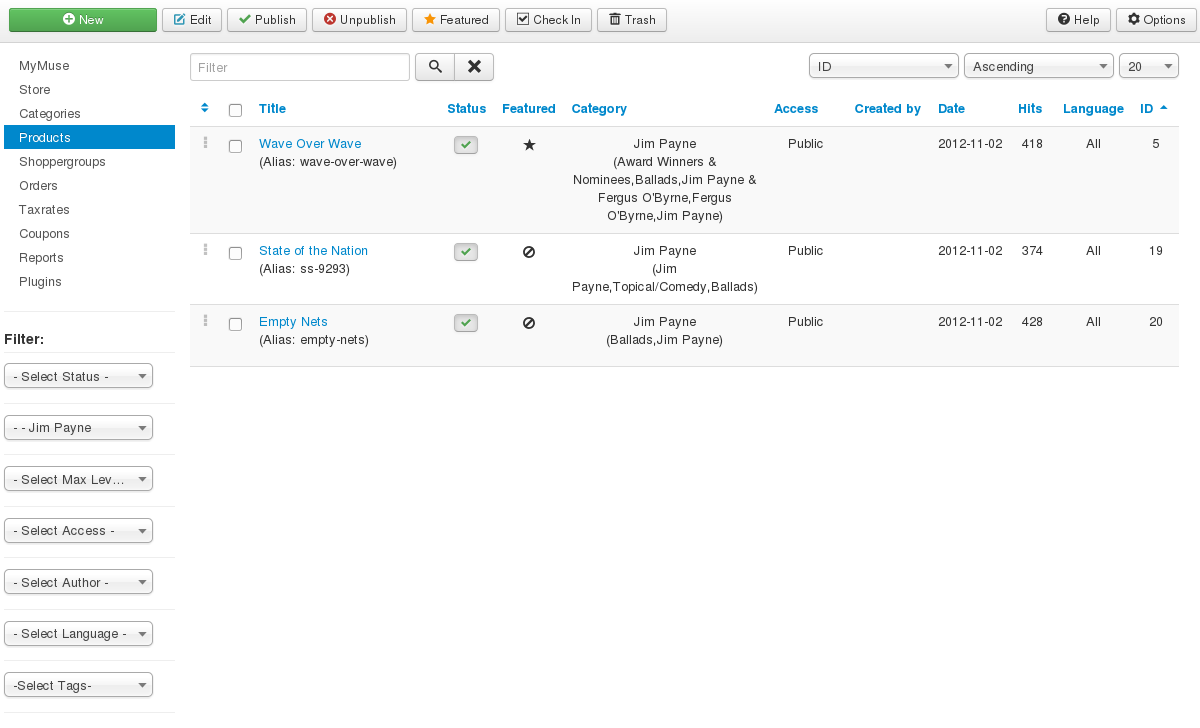
Screenshot
Column Headers
- Ordering. Up-Down Arrows
 User specified ordering, default is order of item creation. When active, drag and drop ordering by 'click and hold' on the bars icon
  then 'release' in desired position.
 - Checkbox. Check this box to select one or more items. To select all items, check the box in the column heading. After one or more boxes are checked, click a toolbar button to take an action on the selected item or items. Many toolbar actions, such as Publish and Unpublish, can work with multiple items. Others, such as Edit, only work on one item at a time. If multiple items are checked and you press Edit, the first item will be opened for editing.
- Title. The name of the item. For a Menu Item, the Title will display in the Menu. For an Product, Section, or Category, the Title may optionally be displayed on the web page. This entry is required. You can open the item for editing by clicking on the Title.
- Status. (Published/Unpublished/Trashed) The published status of the item.
- Featured. Whether or not the Product will show on the Featured Products Page (below the Store description). You can change a Product's featured state by clicking on the icon in the column.
- Category. The Category this item belongs to. (With other categories in parenthesis)
- Access. The viewing level access for this item.
- Created by. Name of the Joomla! User who created this item.
- Date. The date this entrywas created. This date is added automatically by Joomla!, but you may change it in the Publishing Options - Product section of the Content Product Manager Edit.
- Hits. The number of times an item has been viewed.
- Language. Item language.
- ID. This is a unique identification number for this item assigned automatically by Joomla!. It is used to identify the item internally, and you cannot change this number. When creating a new item, this field displays 0 until you save the new entry, at which point a new ID is assigned to it.
Toolbar
At the top right you will see the toolbar:

The functions are:
- New. Opens the editing screen to create a new product.
- Edit. Opens the editing screen for the selected product. If more than one product is selected (where applicable), only the first product will be opened. The editing screen can also be opened by clicking on the Title of the product.
- Publish. Makes the selected products available to visitors to your website.
- Unpublish. Makes the selected products unavailable to visitors to your website.
- Featured. Makes the selected products Featured, appearing on the Store Description page.
- Check In. Checks-in the selected products. Works with one or multiple products selected.
- Trash. Changes the status of the selected products to indicate that they are trashed. Trashed products can still be recovered by selecting "Trashed" in the Select Status filter and changing the status of the products to Published or Unpublished as preferred. To permanently delete trashed products, select "Trashed" in the Select Status filter, select the products to be permanently deleted, then click the Empty Trash toolbar icon.
- Help. Opens this help screen.
- Options. Opens the Options window where settings such as default parameters or permissions can be edited. See Product Manager Options for more information.
Column Filters
Above the column headers on the right, there are 3 drop down input fields, Sort Table by: (preset to Ordering), Select the ordering (preset to Ascending) and a number (preset to 20) to display.
![]()

These column sorting input fields shows the current method of sorting applied to the table. Use the drop down field choices and click the column heading name. Alternatively, click on the column heading to sort the list by that column's value. This will also change the value in the drop field to correspond with the column header name. The list will then be sorted in order by that column and a sort icon(up or down arrow) will show next to the column name. Click a second time to reverse the sort, which will change the corresponding drop field.
- Ordering (default). The column in which to sort displayed items in the table. The values are the same as the column heading names.
- Ascending (default). Shows ordering of selected column, ascending or descending.
- # (default is 20). Shows the number of items to display on one page, default is 20 items. If there are more items than this number, you can use the page navigation buttons located at the bottom of the table. (Start, Prev, Next, End, and page numbers) to navigate between pages.
List Filters
The List Filters, above on the left, and other filters as detailed below are in the left, bottom sidebar. These filters are a series of controls that let you limit what items show in the manager screen. More than one filter may be entered. In this case, only items that meet all of the filter conditions will show on the list.
Filter by Partial Title or ID. In the upper left is a filter or search field and two buttons, as shown below.
![]()
-
- To filter by partial title, enter part of the title and click Search.
- To filter by ID number, enter "id:xx", where "xx" is the ID number (for example, "id:9").
- Click X to clear the Filter field and restore the list to its unfiltered state.
Filter by Published Status. Lets you show only items with the selected published status.
![]()
-
- - Select Status -: Shows items that are Published and Unpublished. Does not show items that are Trashed or Archived.
- Published: Shows only items that are Published.
- Unpublished: Shows only items that are Unpublished.
- Archived: Shows only items that are Archived.
- Trashed: Shows only items that are Trashed. Important Note: To permanently delete items:
- Change the status of the items to Trashed.
- Change the Status filter to Trashed. At this point the trashed items will show and an icon called "Empty trash" will show in the toolbar.
- Select the desired trashed items and click on "Empty Trash" in the toolbar. The items will be permanently deleted.
- All: Shows all items regardless of published status.
Filter by Category. Lets you show only items assigned to a specific category. The list box will show the categories defined for your site.
![]()
-
- - Select Category -: Show items assigned to any category.
- <your category>: Show items assigned only to this category.
Filter by Max Levels (Category Level). Lets you show only items whose category is at or above the specified level in the category hierarchy.
![]()
-
- - Select Max Levels -: Show all items regardless of level of their assigned category.
- 1: Only show items whose category is at the top level in the category hierarchy (in other words, with categories whose parent category is "- No Parent -".)
- 2-10: Only show items whose category is in the top 2-10 levels in the category hierarchy.
Filter by Viewing Access Level. Lets you show only items that have a specified viewing access level. The list box will show the access levels defined for your site, similar to the example below.
![]()
-
- - Select Access -: Show items with any viewing access level.
- <access level group>: Show items only with this viewing access level.
Filter by Author. Lets you show only items that have the specified author. The list box will show the authors for your site.
![]()
-
- - Select Author -: Show all items regardless of their author.
- <your author>: Only show items with the specified author.
Filter by Language. Lets you show only items that have a specific language assigned. The list box will show the languages defined for your site, similar to the example below.
![]()
-
- - Select Language - or All: Show items for any language.
- <your language>: Show items only for this language.
Page Controls. When the number of items is more than one page, you will see a page control bar as shown below. The current page number being viewed is shaded.
![]()
-
- Start: Click to go to the first page.
- Prev: Click to go to the previous page.
- Page numbers: Click to go to the desired page.
- Next: Click to go to the next page.
- End: Click to go to the last page.
Options
Clicking on the Options icon in the toolbar opens a modal window where you can set component level options for products. To see the help screen for Options, click MyMuse Options
Quick Tips
- If MyMuse is installed without sample data, no category is created. You should create categories before adding products.
- To see trashed and archived products, set the Status filter to All.
- To change the ordering of products within a category, click on the Ordering column heading to sort by this column. Also, it is easier to see the ordering if you filter on the desired category.
Related Information
- To add or edit Products: Product Manager: New/Edit
- To manage Categories: Category Manager
- Hits: 15280